


I wanted to show you the Advanced Google Analytics For Marketing and how to use these reports. If you are just a beginner I highly recommend you read my post on how to set up Google Analytics. It explains all you need to know to get started the right way!
I have recently been studying to do my Google Analytics Certification Exam. So with what I have learned so far, I hope I can offer you some insight into how valuable this free tool really is. If you’re using monsterinsights you may want to see my post to quickly get monsterinsights connected to your google analytics account.
Table of Contents
Let’s Start With Setting Up Custom Dimensions
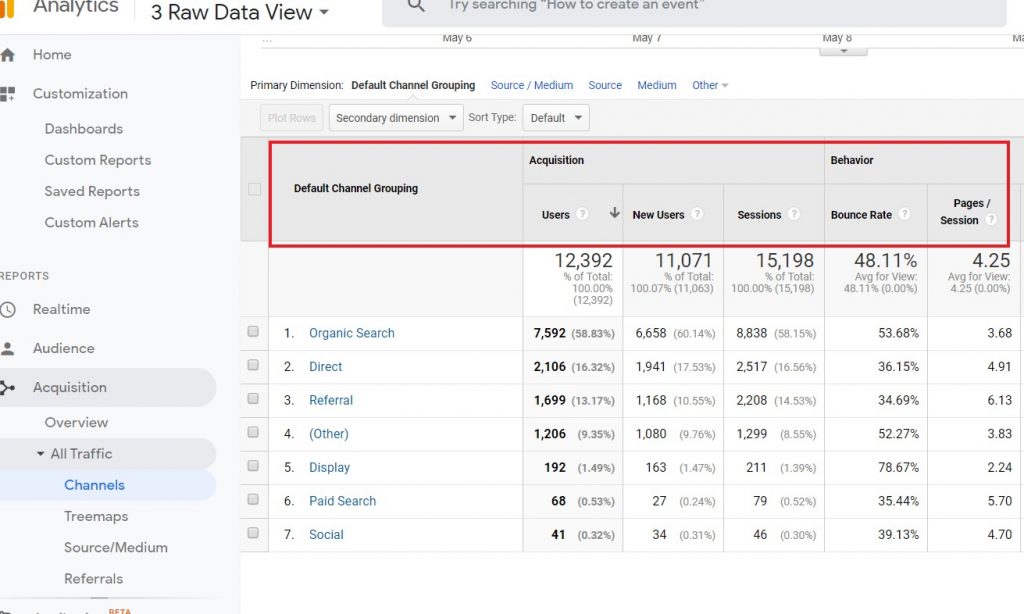
Using Custom Dimensions is a valuable tool with configuration settings you can use to collect the data your business is looking for. So google refers to dimensions to describe the data such as Source, Medium, Gender, Age, Country. Dimensions are also used to measure the data in metrics as a percentage or ratio. Dimensions are shown as the rows, and the metrics are shown to you in columns.
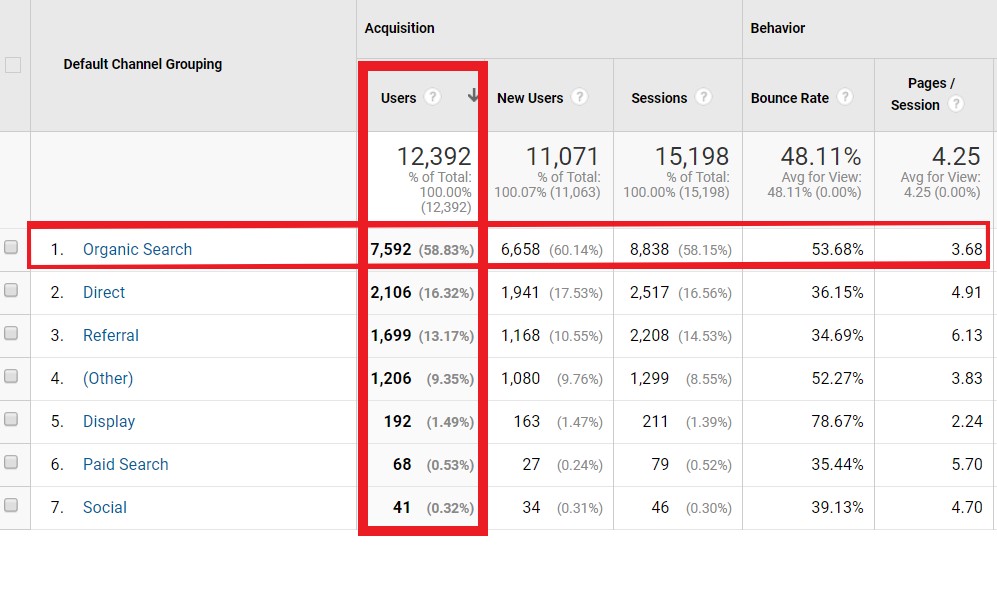
By setting up your own dimensions you can import data that google analytics would not normally collect. This can be combined then with your data for a more precise look at things. You can access and create secondary dimensions in standard reports you may need.
Dimensions include things Google Analytics does not
For instance, Pet Frenzy does accept submissions from other authors. I can then set up a dimension to capture just the author’s data on my site. The differences between them to attract new authors to the website. I will know how many page views the author may have as well as get new content ideas that are working.
Google Analytics by default will not collect information on authors from individual blog posts. You need to set that up using a dimension. You can also do the same for distribution such as methods of shipping or logins for memberships or even types of memberships.
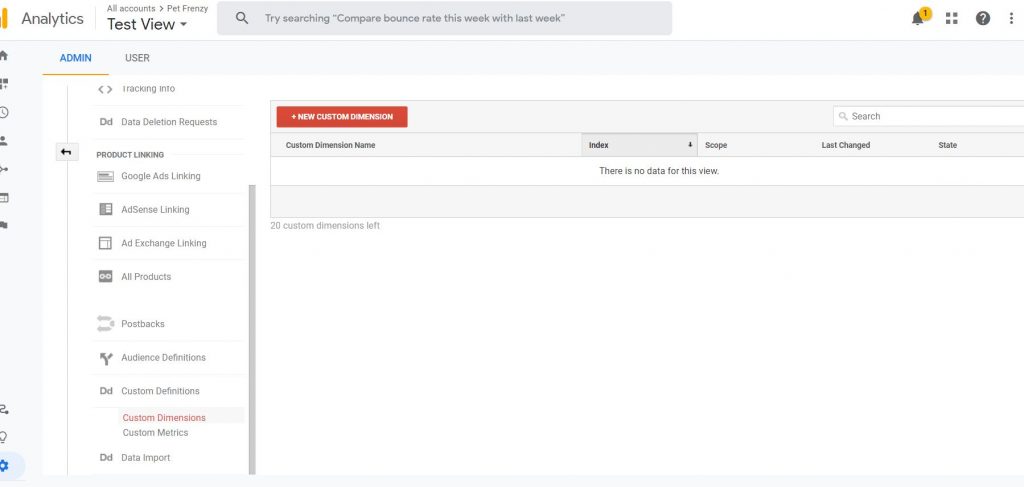
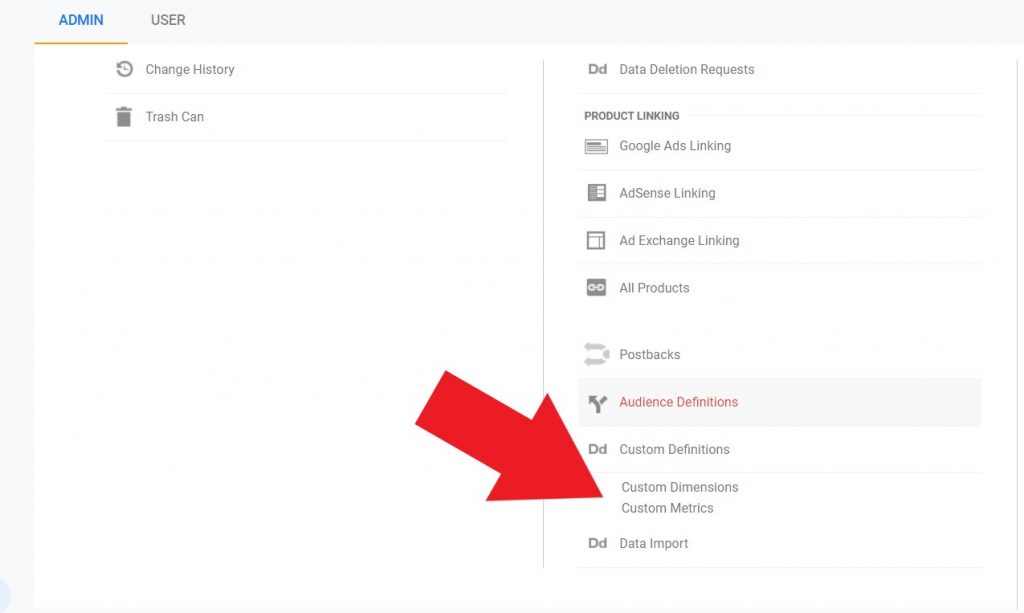
Setting Up A Custom Dimension
Go to Admin/Custom Definitions/Custom Dimensions. You may need to edit the access once again to do so.

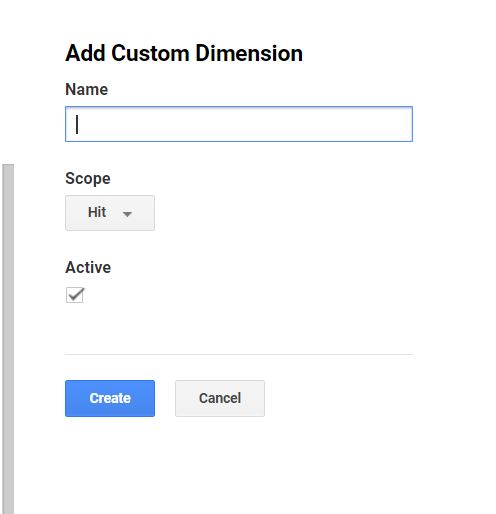
You will see a drop-down box in which you will need to choose from called Scope. So after you have entered the Name for example Author. The drop-down list from the scope will give you the following options:
Guidelines for the scope
First off a scope is where this will be categorized. For a standard dimension, google analytics automatically will categorize the scope. For Custom dimensions you must select the dimension value to be applied. Therefore, a dimension can be one of four things you can choose to use:
- Hit– Value that applies to every single hit that includes Page, Page Title, Event Catagory.
- Session– Value applies to every single session your user has. Things like a landing page, Source/Medium, Campaign.
- User– this value applies to all hits in current and future sessions by the user. Age, Gender, Country.
- Product- Value will apply to the product which will require enhanced eCommerce set up. Products you sell, SKU, and categories.
Once you have created the dimension you must implement the tracking code. Google Analytics will give you the code. Then you can do this by copying and pasting the code into your platform to collect some data. Replace the dimension value with your own. For example, I would use the Authors as the dimension value. You would then need to code it so it will pull the information you want from your website.
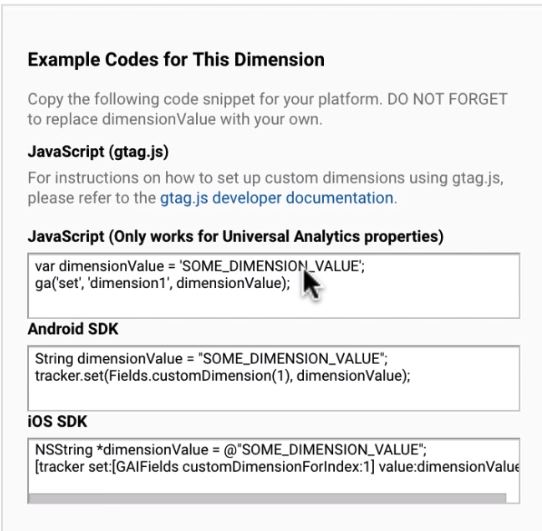
Also, the Google tag manager can help you manage the custom dimension tracking code. Custom Dimensions are optional. But they do have benefits. Google Analytics allows you to create up to 20 custom dimensions. Now when you create the dimension the information is only going to be from the date you created it and onwards not previously.
They Cannot be Deleted
Custom dimensions cannot be deleted, but you can disable them. You should avoid trying to reuse them. In the google helps section it will state: “When you edit the name, scope, and value of a custom dimension, both the old and the new values can be paired with either the old or the new dimension name. This conflates data in your reports in a way that cannot be accurately separated with a filter”
And never send personal information as values. It is against Google’s terms of service and you will have your account suspended or closed. Or sometimes penalized. They also cannot be shared in the gallery such as dashboards as I mentioned in my beginner post.
Setting Up Custom Metrics In Google Analytics
The custom metrics works similar to Custom Dimensions. It allows you to import data that google analytics would not normally collect by default. Again allowing you to build reports with custom metrics which can also be used with advanced segments. Rather than using the columns and rows. Metrics are the headings of those rows and columns.
Creating a custom metric
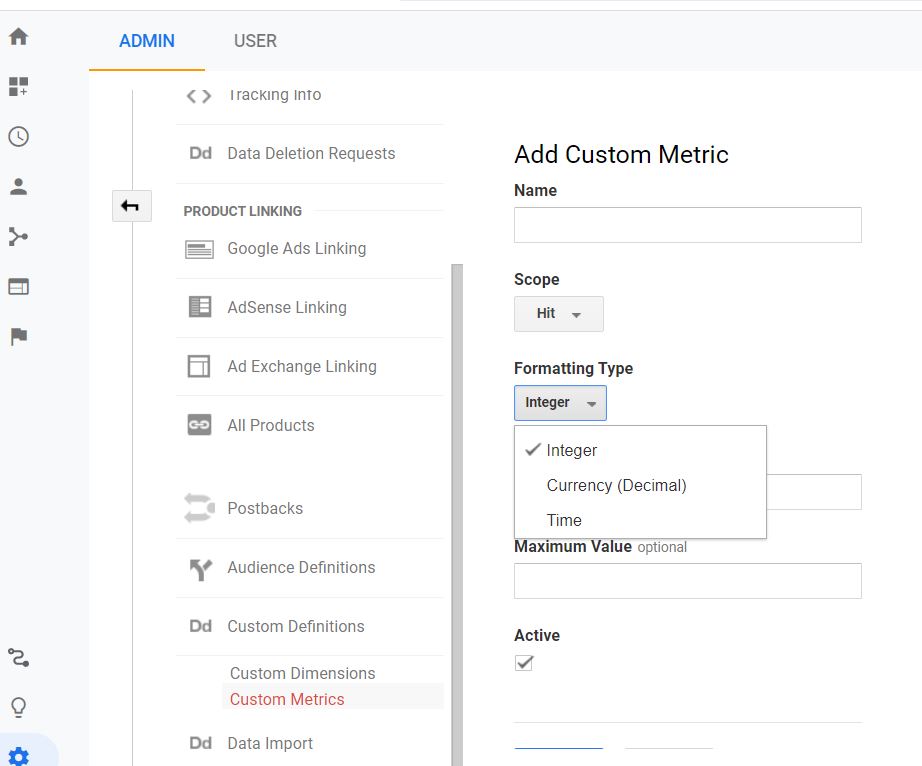
You can change these metrics and add in things like prices, discounts, etc. Then by using the information in your reports to get a percentage or ratio. Especially handy when comparing reports if you have e-commerce. Unlike Dimensions, you will only have the choice of 2 scope options. The Hit or the Product.
Formatting Type
You have 3 choices of Integer, Currency or Time. Once you make the choices you can create your metric. Follow the same process as with setting up a new dimension and implement the tracking code. And again do not forget to replace the metric value with your own the same way did when you set up a new dimension. You can also use the Google Tag Manager to manage this more easily.
As the same as Custom Dimensions this is optional. You are limited to 20 custom metrics. They only gather the information from that point on not retroactively. Furthermore they can not be deleted only disabled and they are not allowed to be shared the same was a dashboard or custom report.
Event Tracking – Advanced Google Analytics for Marketing
Event tracking allows you to view user interactions on your website that Google Analytics does not do by default. You can track interactions that happen on a single page, Unlike Goals which will require a specific page. For example a subscription confirmation page. Using event tracking you can see if people are engaging with the content with their behavior. All the data that event tracking gathers are in the subsection of the which would be found within the behavioral section of the reports.
Example of Events that you may want to track
- Social Likes and Clicks
- Click to Call or Email
- Video Views
- Podcast Views
- Abandoned Forms
- Scrolling, Movement of the user’s mouse
- External links to chats or fan pages
- Buying patterns on your eCommerce site
You will be able to generate reports and use them to better understand how the user is interacting. One that Google does not automatically do. Mainly because each business is different and will be set up differently. So there is no default set up in Google Analytics to accommodate one specific because it can really vary.
How to Set Up Event Tracking In Google Analytics
Copy the tracking code template below to add into your website:
onclick=”ga(‘send’,’event’,’Category’,’Action, Label’, ‘Value’),”
You insert a snippet code that is added to the link on the site you want to track. When the link is clicked it will display an event in Google Analytics. You will then replace the template fields Category, Action, Label, and Value Fields as follows:
For Example:
Replace Category with the Podcast or Video
Action could be replaced with saved, played or download
The label is optional and it can be used to summarize the event, for example, a certain name of a podcast or video.
Value is also optional and is that is adding a numeric value
Manually you can implement the tracking code by adding the link + event tracking code into your website. You can also use Google Tag Manager to add in the tracking code more easily.
onclick=”ga(‘send’,’event’,’Category’,’Action, Label’, ‘Value’),”
It would look something like this from a page I would have on my website to download a dog care video for example: I would look for this on my page to add the snippet code to.
” (then the following code if I was going to track the video download from that page.)
onclick=”ga(‘send’,’event’,’Video’,’Download’,Dog Care’),”>Anchor Text
Event Reports
If you’re using MonsterInsights I have a great post on Using the Event Tracking in WordPress with Google Analytics. This is great if you’re really not into coding much on your website.
To view your reports you click on the Behavior tab from the sidebar, Events/Overview to see how your event is performing.
Custom Session Settings
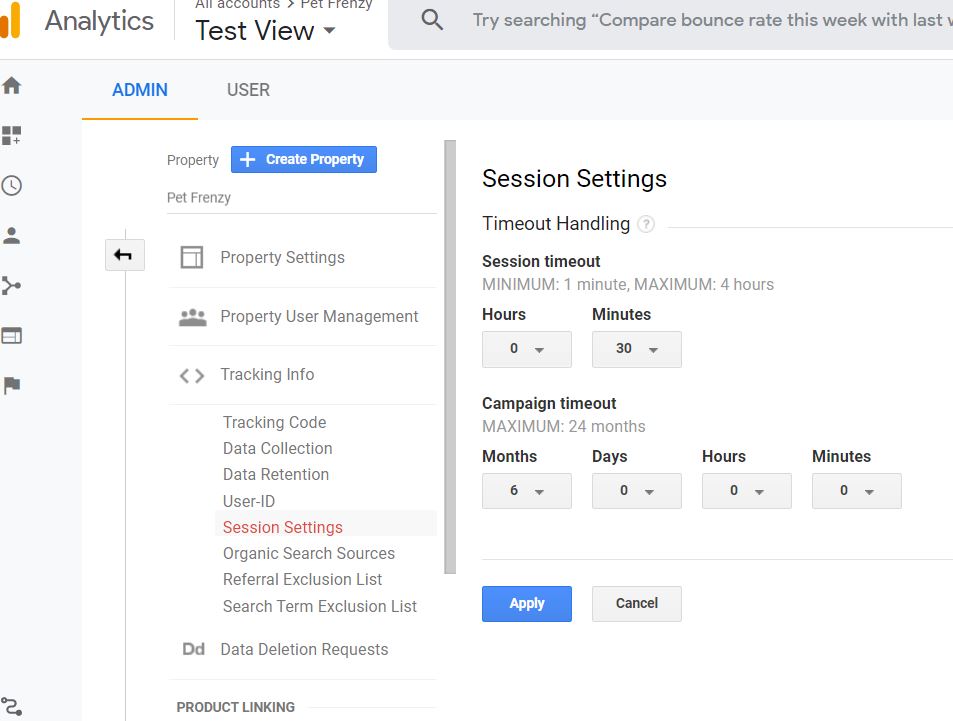
By default, Google will end a session after 30 minutes of inactivity. In the custom session settings, you can lengthen the session time. This is helpful when you have a game or questionnaire on your website.
To lengthen a session time you first go to the Admin/Select the Account /Property you want to edit, click on Tracking Info then Session Settings to adjust this.
Using Cross-Domain Tracking
Cross-domain tracking allows you to track users from multiple domains. A good example is if you are using a separate site for your shopping cart or eCommerce. To use cross-domain tracking you can set that up through Google Tag Manager or modify the tracking code yourself.
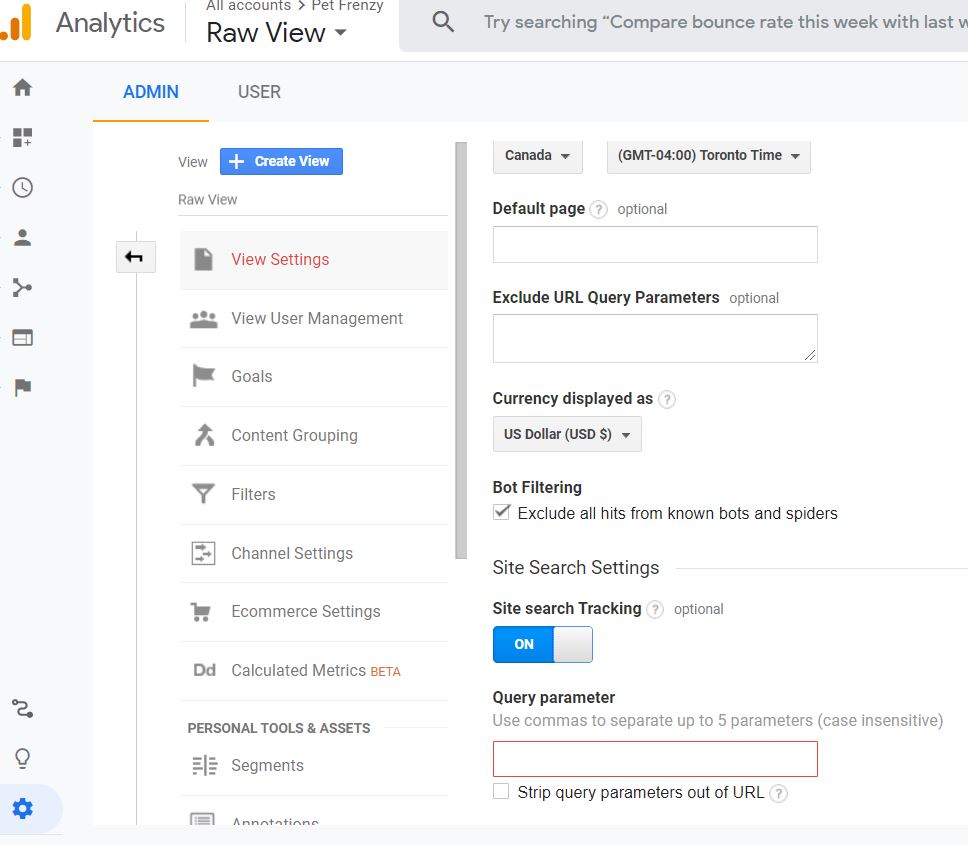
Internal Site Search
This is a great feature that can help you understand what people are searching for on your website. This can help you generate some new keywords to use in your next post for example or your next advertising campaign.
To set up site search you can go to your Admin/View/View Settings. Enable the site search tracking and enter the query parameter that your website uses in the URL for your search box.
Custom Channel Group
You can customize how your Google Analytics groups channels in your reports. A channel is the top-level groupings of your traffic sources. For example your organic search, email, or social.
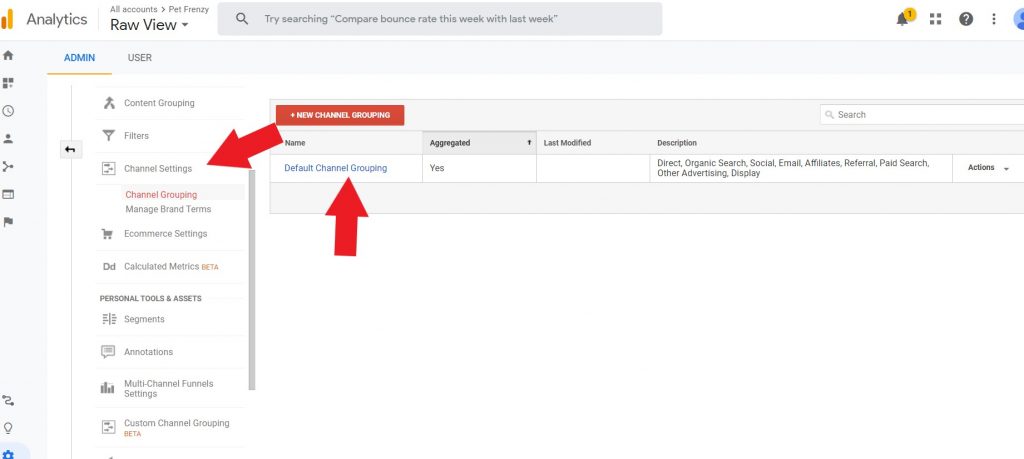
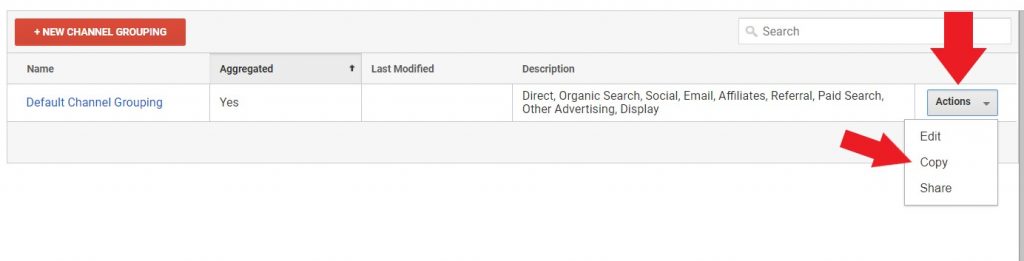
To customize a channel group you can set it up by going to the Admin/Make a copy of the default channel group. Edit it to label your traffic in other ways for analysis.
Data Import
You can upload data from any external source and combine the report with the data in Google Analytics. Rather than collecting the data from a javascript tracking code, you can use data import. However, if you are importing any custom dimensions or metrics you will need to create those first.
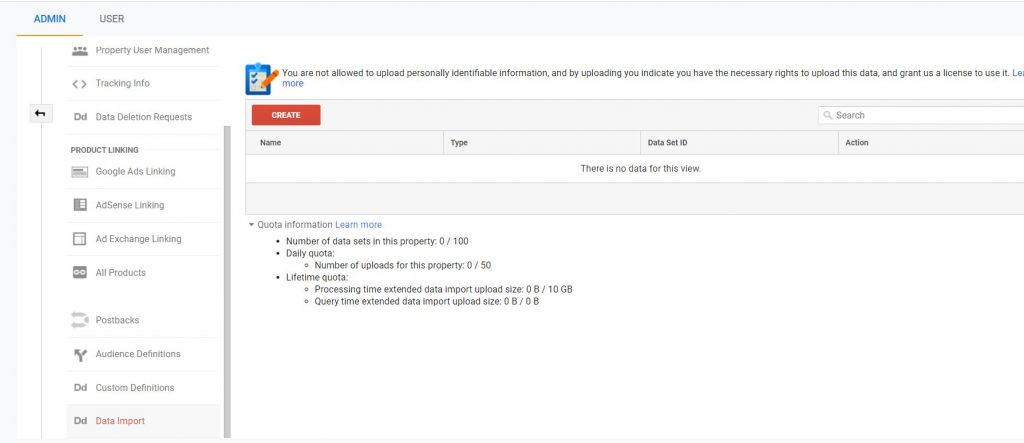
You can upload your CVS file or excel file to google analytics.
More Powerful Tools
Segments will allow you to compare specific data to various groups of users on your website. You can compare up to 4 segments at a time in a report. They also do not alter any data as filters do. Furthermore, you can apply them to historical data and more.
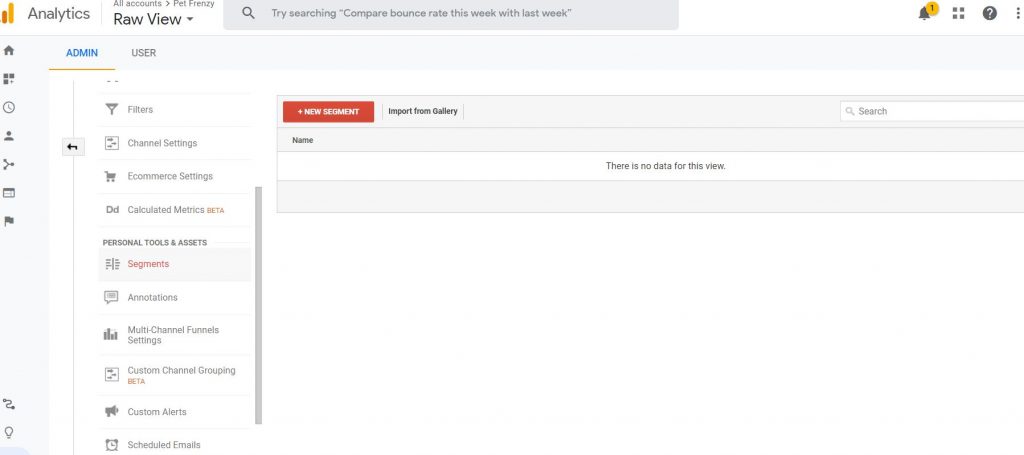
Segments can be valuable if you want to understand who the visitors were that high-value spender or the characteristics of those that bought items compared to those that didn’t buy. It can be a valuable tool for any marketing campaign. There are a couple of ways you can add a segment. You can create the segment from the admin tab/ personal tools and assets/Segments. Create your segment here:
OR Click on any report to add the segment
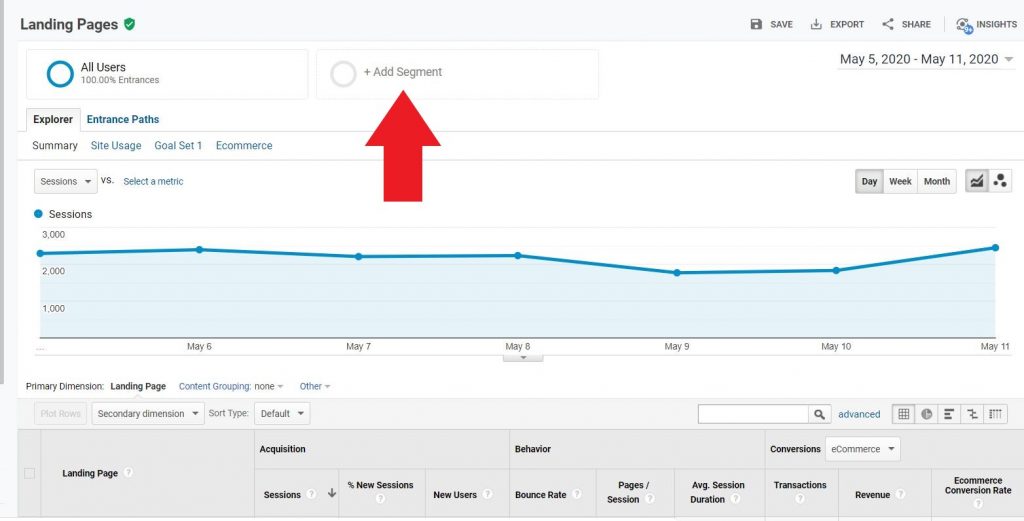
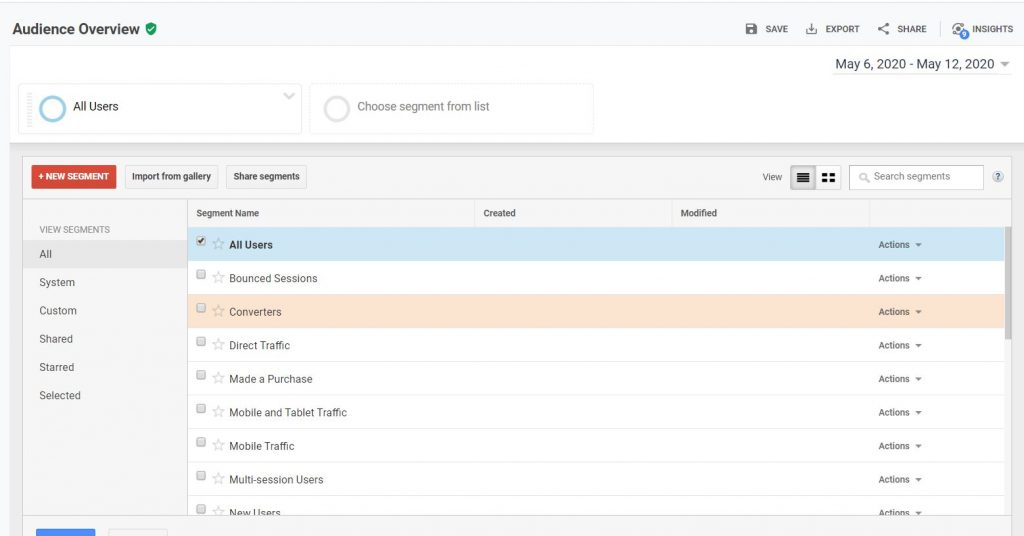
By adding a segment this way you can also choose from previously made segments or those that google will generate for you. To add to the report view just click on the one you choose.
From here you can customize any of your segments to your business needs. By isolating some information from your report you can quickly access what you want to see in a more customized report.
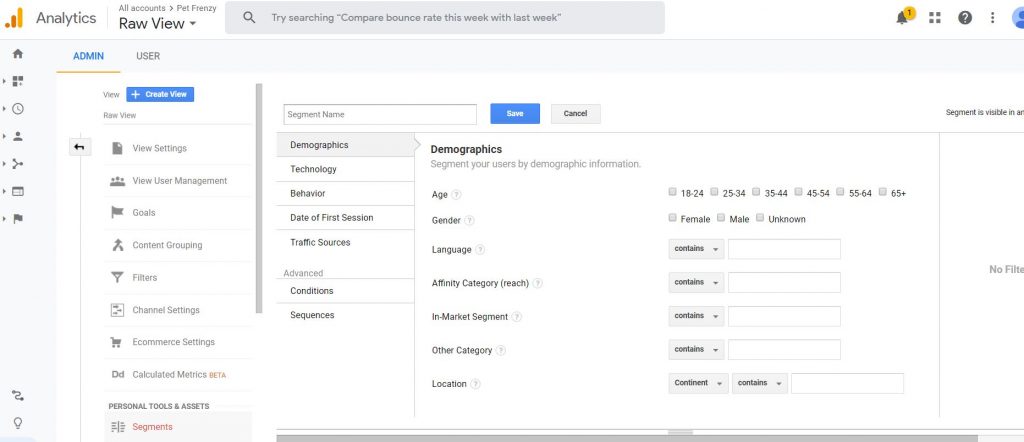
If you want to set up any custom segments you can do so under the conditions tab in the sidebar. You can see that in the screen section above. You can then apply them to view the report. These segments will show in all the reports until you change them or leave google analytics.
Using the Multi-Channel Funnel (MCF) Reports
By using this tool you can understand conversion paths, channel contributions, and optimize your marketing by knowing how the channels can affect your budget. It will allow you to view the bigger picture.
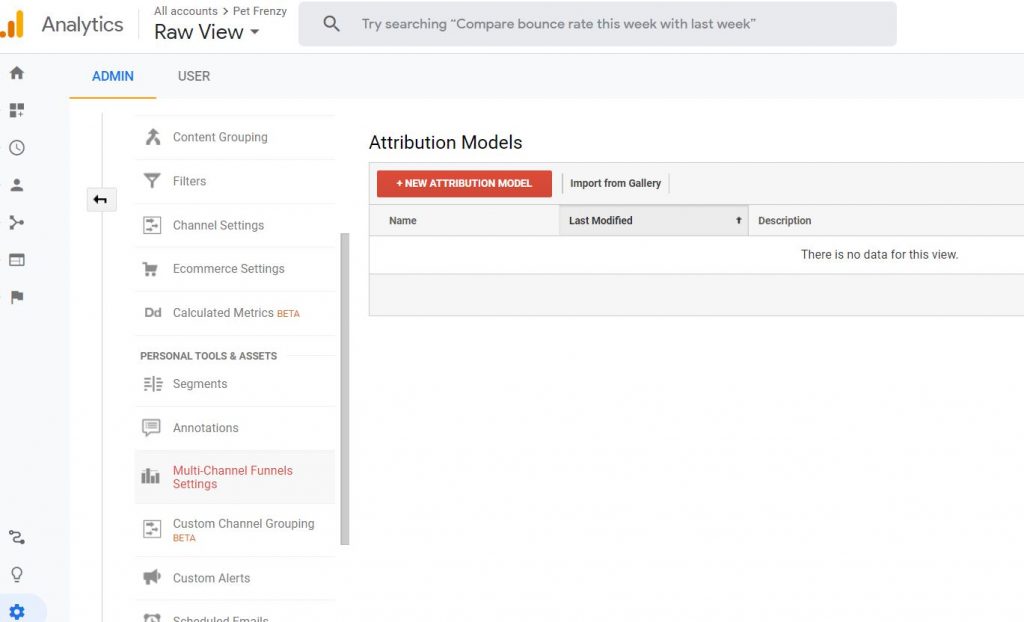
You will need to create a new attribution model to use this. An attribution will determine how credit for sales and conversions are assigned to touchpoints on the path. So we will take a look at what it will look like once you have that setup.
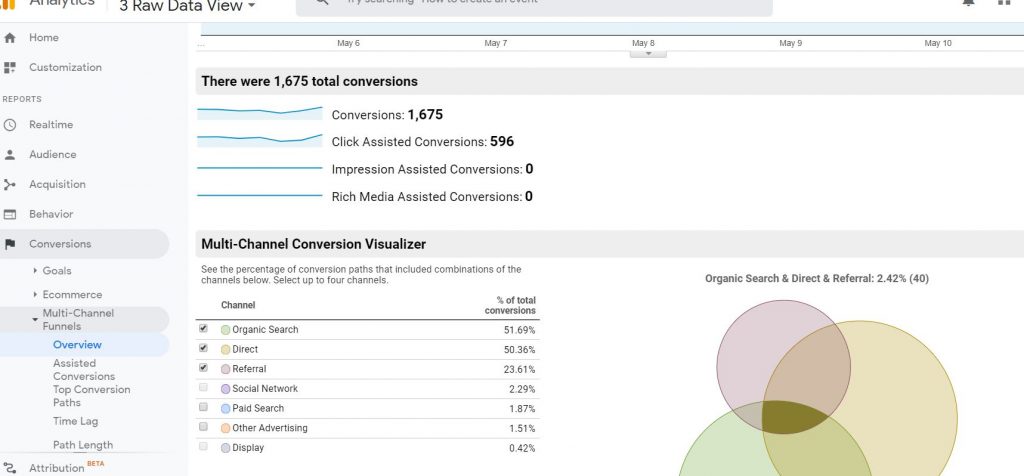
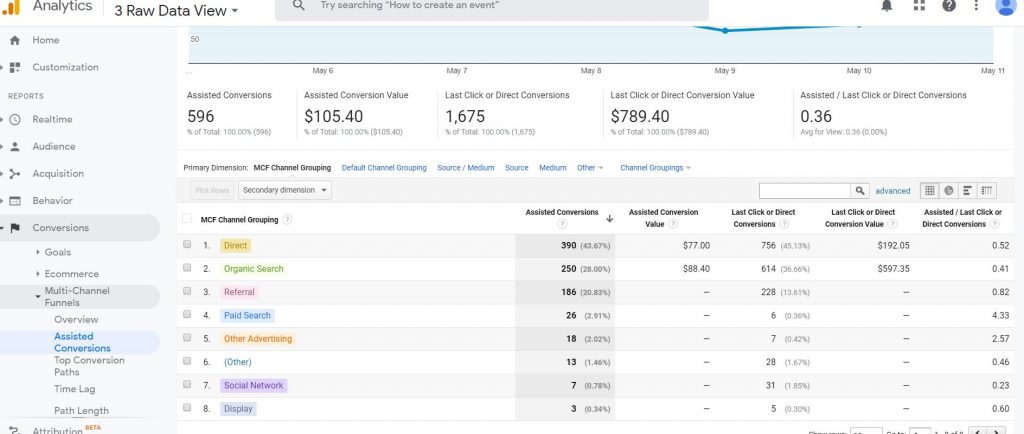
The Assisted conversion report will give you an overall value of the conversions.
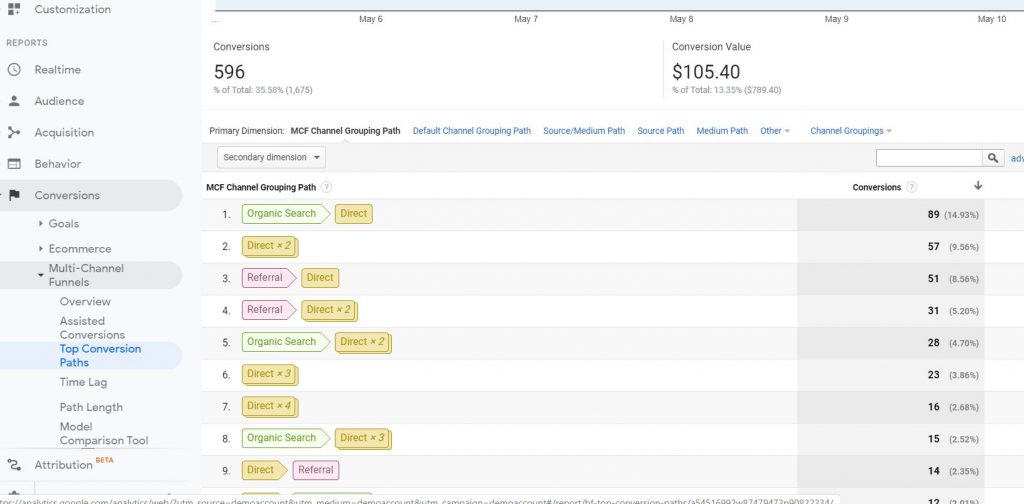
Top Conversions Report will show you which routes your customers took before the conversion.
Limitations on MCF
These are just some of the reports you can generate with the Multi-Channel Funnel reports. In order to use this tool, you must set up your goals and e-commerce tracking. For Google Ads, you will need to link your google ad account with analytics. For any custom campaigns, you will need to complete the campaign tagging. Paid searches on Bing or other search engines will also need campaign tagging.
Creating Custom Reports in Advanced Google Analytics for Marketing
The one benefit I love is the opportunity to generate reports for specific team members. Allowing us to gain valuable insights to accomplish any goals we have set. This is where your metrics and dimensions can be used as we discussed earlier.
Using the custom reports can help with presentations by only presenting what is needed. By exporting data into other software for analysis can be used as well. For instance you can import them into a spread sheet to send the accounting or marketing department in your business. You can include more than 2 dimensions per row.
Setting up a Custom Report
For instance you can set up a custom report to evaluate when your website gets the most traffic and on what days. This can help you plan for site maintenance and planning any new campaigns.
Go to Customization/Custom reports/ create report . You will need to set up your metrics and dimensions in this section. If you do not want to create your own you can find some in the Google Solutions Gallery that you can use.
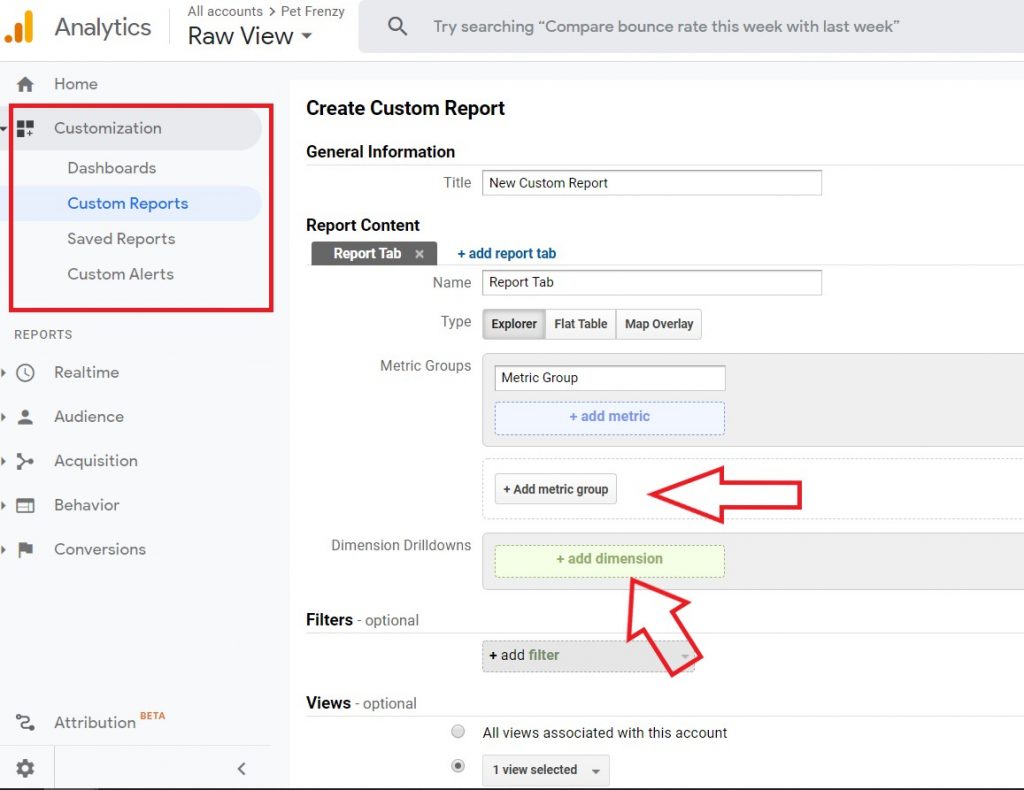
The custom reports will not let you pair any metrics or dimensions from different scopes. They MUST be from the same scope. Like Hit, Session, Product as we discussed earlier on.
Re-marketing a Campaign in Google Analytics
Using this tool you will have a higher conversion rate. It is used to entice return users to complete a conversion. This allows users to get one step closer to purchasing your product/service through your ad.
You can click the Admin settings in AdWords and enable remarketing a certain campaign you made previously that was very successful and already has a target market.
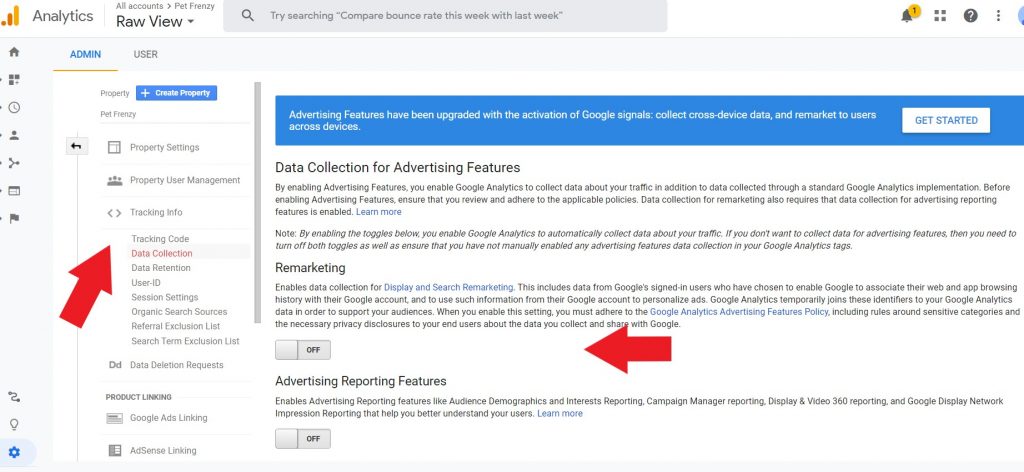
Setting Up the Standard Re-marketing
First, you must have your google ads account linked to your Google Analytics account. Go to Admin/Tracking Info/Data Collection and turn on the Re-marketing and Advertising Reporting Features.
You will need to add a new re-marketing audience. You can do this through the Admin/Audience Definitions/Add New Audience.
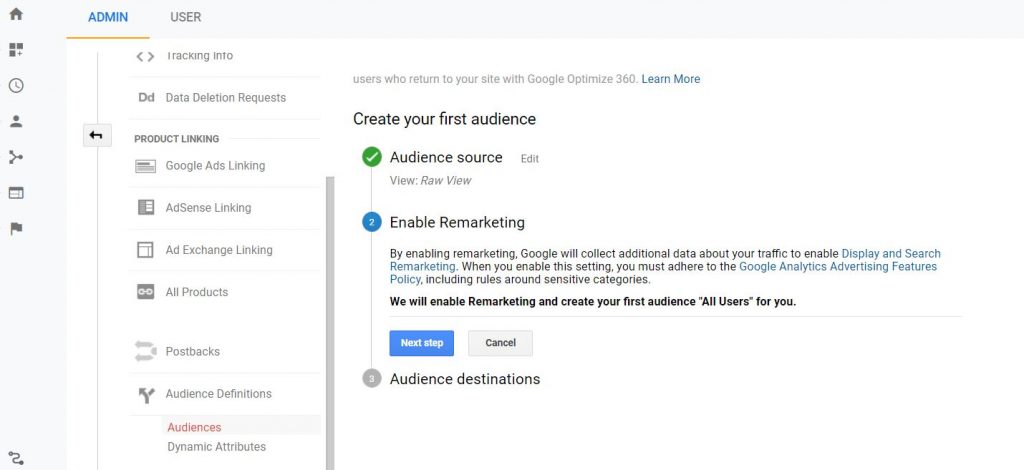
This is very similar to the previous section on segments. You would create your audience by filling in the needed information. Click publish to Google Ads so you can refuse the campaign there as well. Google will populate a list for you automatically. You can rename these and put them in lists of your own once you have become more familiar with creating lists.
Some Disadvantages
In order to use this tool, there must be a minimum of 100 unique users in the campaign your re-marketing first. The maximum days you can include the user is 540 days. The downfall is that if a user clears their browser cookies they won’t be included until they visit your website once again.
Overall Benefits of Using Google Analytics
Not only will this increase your knowledge of your customer needs and interactions on your website. It gives you the tools to create amazing reports to help your business thrive and grow. I would highly recommend using Google Analytics to also improve your page speed and many other things that could affect the traffic flow to your website.
You can also send data to Google Analytics from any internet connection including a point of sale system or kiosk by using the measurement protocol.
You will want to start setting up your account and configuring all the settings to start collecting the valuable data your website needs. Remember a lot of these options are not retroactive and only start collecting the data after they are created.