

Table of Contents
All Dogs Can Be Trained
Dog Training Step By Step and learn the dog training basics. Most People believe that rescue dogs cannot be retrained. Well, they can with hard work and dedication like any dog. No matter what their age. You will need to teach them what you want them to do. Dogs of any background will be loyal and will want to please you every chance they get. If you reward them they will keep doing what you want them and need them to do.
Should You Get A Trainer
I will give you a good example, we adopted our Perra Presa Canario and had no idea that she had no training or socialization skills at all. We had to build those skills and the confidence to go with it. Most of her aggression was just fear.
We decided to hire a professional trainer. We saw that she had an extended background on rehabilitating aggressive dogs with our local humane society for years. It was money very well spent. I would personally recommend her to everyone!
Hiring a Trainer
We hired a trainer and what we really thought was, OK she is going to fix this for us. Well wrong, she will guide you, show you and help you do the work. You need to do this on your own. Your dog will then understand this is what they need to do for you, not for the trainer alone. I call it people training, not dog training.
In the end, we do have to do all the work to build not only confidence in the dog but our confidence in order to have the ability to feel in control at all times with our new dog. Even with the techniques below. These are things to help you practice. You will definitely impress your trainer. Most importantly to keep you practicing. I am in no way a professional dog trainer, these exercises are only to help you work with a professional.
Learning just the Basics
I have divided this section up into training topics, because some dogs may already know the basic commands of sit, lay down, give a paw and stay. However, you can skip this section and go onto excessive barking or pulling on the leash. Whichever fits your situation.
These methods are all based on our experience and are tried and true methods that work. All methods are also positive reinforcement. Instead of using treats if your dog is overweight or not as food motivated as others. You can use their favorite things or new toys as well for the reward.
Choosing Your Dog’s Treats for Incentive

We chose to use Charley Bear treats, they are available at any pet store and have many flavors like Blueberry and Bacon which is Jasmine’s favorite. They only have 3 calories a treat so she can have plenty for training without worrying about the weight gain. For smaller dogs, you can use smaller training treats in the pet stores.
Do take note of the contents in your treats. This is extremely important for keeping your dog healthy. My husband sometimes will eat the treat themselves to taste it. Something I am not quite as willing to do!
Higher Rewards
For walking and more in-depth training, her Big Reward was cheese. You can use other stuff like real chicken cut up into tiny pieces, they only need a crumb nothing more. The size of the treat does not matter trust me,
So I would us small diced watermelon or banana’s to cut down the calories. Remember these have to be safe and small. You can also see my article on what to give your dog and what not to. Here is the size of cheese treats we give our XL breed for training on really big rewards.
Size Matters

As you can see from the slice of cheese it’s cut in half than in very small pieces of cheese. You don’t need to give them huge pieces than can become unhealthy. We eventually haven’t needed to use big rewards anymore, but in the beginning, it may help with training for those extra special accomplishments. This will provide more motivation.
Some dogs get bored very quickly when using just dog treats. This is another option. You can do this with chicken, beef, etc. As well.
Click Training
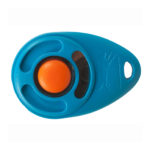
We also bought a clicker you can buy from any pet store, they are under $10.00 and well worth it. It is called Star Mark Pro-Training Clicker. Or you can get a three-pack for under 10.00 if click on the Clickers link below.

Let’s Get Started
I do hope you will find these methods useful and a start to having your perfect furry friend you always wanted. Before skipping to the selection you want, please take note that your dog must know how to FOCUS on you before learning can be achieved. So please take a brief look at the Focus command and why it’s important to use this. Especially if your dog is easily distracted by other things. A good example is other dogs barking or children screaming, even someone on a skateboard or bike may throw them out of FOCUS. You will need to distract your dog to achieve this goal.
Basic Commands
Getting used to the clicker
You will first need to teach your god that a treat is associated with the clicker. So try this about 10-30 times depending on fast your dog is catching on.
- CLICK
- TREAT
- Repeat
That is all you need to do so that the dog will associate the sound of the clicker to the treat. Once you have accomplished this you can move forward and teach them Focus. You’re next really important step. When you click it is VERY important that you don’t fumble or take a lot of time to give the treat. If you do take too long they won’t associate that click with the treat. Once your confident that your dog is associating the click sound with a treat you can move to the next exercise.
FOCUS:
This should be your number one step in any part of this training. You need to establish total focus on you and nothing else around you. As you can see from my photo, I was first getting her ready to focus on every time we were learning a new command. I was rewarding her for having eye contact only. Every time she would look away I would do the following:
Have your dog come to you showing them the treat. Once they see the treat, tell them to FOCUS, once your dog has shown you eye contact, it is important to Click and treat right away. Reward them when their pupils meet yours.
Clicker Training
Now if you are click training, you MUST click than treat right away, if you fumbling around to get your treat after you click you will not have much success. You need to fast and then repeat until they are totally focused on you.
- FOCUS
- CLICK
- TREAT
- REPEAT
Practice
Now practice this when walking beside your dog around the house. Click and treat every time they look at you. You will notice they will be focused on you the whole time. And following you if you hold the treat down but not accessible for them to just grab.
They must earn that treat. Here is a good example in this video of Jasmine. MAKE SURE THEY KEEP EYE CONTACT WHILE WALKING BESIDE YOU. PRACTICE PRACTICE PRACTICE. For dogs that have become deaf, you may want to learn all about hand signals instead of words. Same base training only they really are less distracted which can be great when teaching hand signals.
- Hold the treat where they can see
- Tell your dog to “Focus”
- Once they have eye contact
- CLICK. TREAT. REPEAT
Sit:
Again you want to use the focus training we used in the previous section. Once they are fully focused on you, You can now ask them to sit. I found that in the beginning, Jasmine would automatically sit. I would have the clicker and each time she would sit down on her own I would take note and click and treat every time she sat down. Then I would start saying SIT every time she sat down, click and treat. I repeated this only for a while with her.
This one was very fast for her to learn. So just keep repeating until they sit when you tell them. Once that has happened, they will associate the Sit command with a click and treat. You can also place the teat above them as you see them look up most of the time they will sit on their own. Here is an example:
This is just until she actually learns and relates this command with sitting.
- TELL YOUR DOG TO SIT
- CLICK
- TREAT
- REPEAT
Teach Your Dog its Name:
When we adopt a rescue that we know nothing about. Sometimes they name them in the rescue place you adopted from. You can choose to keep this name if it working for your pet so far. Or you can opt to give your dog a new name. When you give your dog its new name you need to teach the dog to respond to you. Jasmine’s previous name was unknown.
We tried everything to find out what her name really was because we adopted her with the name Princess Jasmine. So we kept Jasmine and worked with it. What a challenge this was. But in the end, she now responds to her name automatically with some exceptions of a distraction now and then.
I had no previous training in this but I managed to do it with time and patience and lots of 3 calorie reward treats! Here are the steps I took to accomplish this below.
THIS COMMAND WILL TAKE LONGER SOMETIMES! JUST BE PATIENT AND REPETITIVE.
Lie Down
Immediately click and treat when you see your dog lay down, Also make sure you say something like ” down” Click and Treat. Read your dog’s body language, you will realize that he will associate click treat lie down. Keep practicing until your dog associates down with lying down. You must reward them hugely for this. I suggest giving your dog a small piece of cheese. Different from your regular treats. The dog needs to feel like he won the lottery. The smaller the space the dog has, the most likely he will lie down.
Try to use one-word commands. Like Sit, Down, Stay. And keep repeating this until the dog knows how to lie down.
DOWN, CLICK, TREAT
UP
After the above lesson has been completed. You can then do the same when your dog stands up. Click treat and up. Dogs will automatically return to an up position. You just need to relate the click, treat to the up. Here is another example with the video below. (Video coming soon)
COME
This one is very important. You will want your dog to come to you when you tell it. I found this one fairly easy. I would ask Jasmine to sit. Then I would hand signal to her to stay. Once I was in place I would tell her to come.
Each time your dog comes to you pet his head and loop your hand under his collar before you give the treat. This is to get your dog used to being held when he comes to you.
Let Them Have A Choice
Dogs will pull away if they think they are being cornered into something they would rather not be doing. This should be a habit for you as well as the dog. Especially with a rescue dog. You’re really will not fully know all they are going through. You want them to be comfortable with you grabbing them in emergencies.
Practice calling him when he is interested in something else. Vary the reward each time: sometimes a treat, sometimes just praise
STAY
This command may be unnecessary, since teaching your dog to sit or lay down should keep him in that position until you give the release command, it is sometimes helpful to have a stay command for longer periods of waiting, or if you want your dog to freeze in the middle of an action.
Step 1: Have your dog sit. Click and treat.
Step 2: Say ‘stay.’ Wait six seconds. Say ‘release’ then click and treat.
Step 3: Say ‘sit,’ ‘stay’ and wait ten seconds. Say ‘release’ then click and treat.
Step 4: Repeat four or five times per session.
Step 5: Practice this trick in multiple sessions every day, gradually building up to several minutes before releasing it.
Other Basic Commands
Loose Leash Training
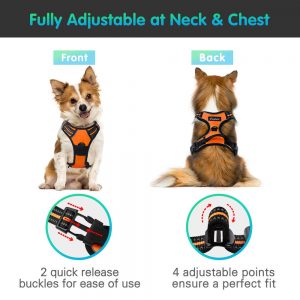
It is extremely important that you have purchased a good harness to walk your dog. Here is the one recommend. We purchased ours on Amazon. It is working great. We have had no issues with this one at all. We have a dog that is 145 lbs and still a puppy.
The reason I recommend this one is. If you hook the leash on the front of the harness, The dog will not pull. If you hook the leash up to the top. The dog will pull. It is a natural reaction for dogs. If you start outright, it will make a difference.
Practice around the house, until you get the leash as we have in the video. It should look like a J when you’re holding your leash. If you tighten up the leash the dog will go into an alert mode. If you handle your leash loosely. The dog will learn how to make the right choices on its own.
Heel
After you have the loose leash walking started. This is an excellent follow-up command to teach your dog.
Step 1: Begin by having your dog on a leash looped to your belt on your left side. That way you don’t have to use your hands to hold the leash.
Step 2: Should your dog pull on the leash, never go in the direction that your dog is pulling.
Step 3: When your dog is close to you with his shoulder by your left leg, then click and treat. (If you are walking you will have to stop to treat. That’s ok, using the clicker in this way greatly speeds up the time it takes for your dog to learn this important skill.)
Step 4: When your dog starts walking regularly by your left side, begin using the commands “Let’s go” and “With me” so that the dog will associate those commands with that position by your side. These commands are more natural than saying “Heel.”
Step 5: Click and treat. Every ten steps that your dog completes by your left side.
Step 6: Work in 10 to 15-minute sessions. Four times each day until the skill is mastered.
Step 7: When your dog is faithfully responding to the “Let’s go” and “With me” commands by walking by your side. Then you can begin off-leash training.
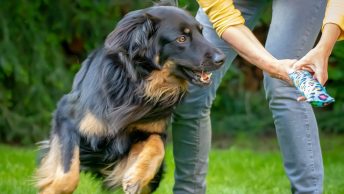
How To Stop Your Dog From Pulling
In this demonstration, you will see that when the dog is pulling, you turn and walk in the other direction. Do this whenever your dog starts to pull. They will eventually stop. Just keep being consistent. Make sure you have the right harness when doing this. If you’re using a collar, make sure it isn’t chocking them. Before I give you an example, take a minute and see what collar we use. On long walks we always have her harness on as well.

Take It Command
This is a good command for your dog to learn. We will be building off this command when you have taught your dog how to Take It. This is another command that can save your dog’s life. But first, let’s see how this is done.
Step 1: Get one of your dog’s favorite toys and set it on the ground. Wait for him to pick it up in his mouth. Click and treat.
Step 2: Repeat this several times. When he starts picking up the toy without hesitation, start using the command take it when you click and treat.
Step 3: After a few times of that, see if he will pick it up at your command!
Step 4: See how many objects he’ll pick up! Point to the sock and say, take it. Click and treat. Point to the remote and say take it, etc.
Remember is your puppy is struggling with this command. Don’t give up. Keep trying until your dog knows what you mean.
This could save your dog’s life!
Whether you’re on a walk or your dog is playing in the back yard. You don’t want your dog eating anything that is poison or things like chicken bones. Dogs tend to sniff and pick things up and eat them before we have a chance to see what they are eating.
Trying to get it out of their mouth is another thing. This command will eliminate your dog from picking up anything and eating it. It could save their life. So please do not give up on this command.
Leave It
Step 1: With your dog on a leash, let her smell the dog biscuit – then drop it two or three feet in front of her.
Step 2: Call her by name and say “leave it” as she starts for the treat. Restrain her with the leash.
Step 3: When your dog looks at you, click and treat with the chicken cube. Praise her as she gives up the dog biscuit for the chicken cube treat.
Step 4: Repeat steps one to three. Five times the first session.
Step 5: In your next session: repeat steps 1-4. Use part of a hot dog as the bait and liver as the reward.
Step 6: In subsequent sessions, teach “leave it” as above, training off-leash in a fenced yard.
Step 7: Regularly call your dog away from things that she likes – other dogs, treats, etc., and then let her go back after you have praised her.
I sometimes use this command if she is barking in the backyard at something. I may call out “Jasmine, Just Leave it” and she now stops barking. Leave it is a warning to my dog. She gets that now. It was one command I do recommend you teach your dog.
Bring It
This command is easily taught to leave it. Your dog will begin to know when to leave it, and when to take it. You can give them some choices. This will start building confidence in the dog, and you as well. Now you teach them to bring it to you.
Step 1: Tell your dog to get a toy by using the “Take It” command.
Step 2: Encourage your dog to come towards you with the toy. Click and treat if he brings it towards you a few steps. Do this a few times.
Step 3: Keep encouraging him to come nearer to you with the toy. Click and treat when he comes to you with the toy.
Step 4: Repeat these steps until your dog brings the toy to you each time without much prompting. Use the command “Bring it!” as you teach.
Step 5: Put the toy on the ground and walk across the room. Say, “Take it” and “Bring it!” If your dog obeys, click and give him a jackpot!
More Advanced Commands
In the next section of Training, you will learn more complicated commands to teach your dog. However, you will need these basic commands first. Remember to be patient. Don’t give up on your dog.
They need you to teach them proper commands to keep them safe and to keep you in control. These commands as I mentioned before will give your dog confidence in time. Everyone will be impressed by how well behaved your dog is.
I hope you enjoyed this section and hope you will check-in for my page on teaching your dog more advanced commands.